
Floating Wooden Shelves: Easy DIY Woodworking Plan for Any Room

Floating wooden shelves add storage without bulky brackets. This easy plan shows an economical build you can finish in a single afternoon.
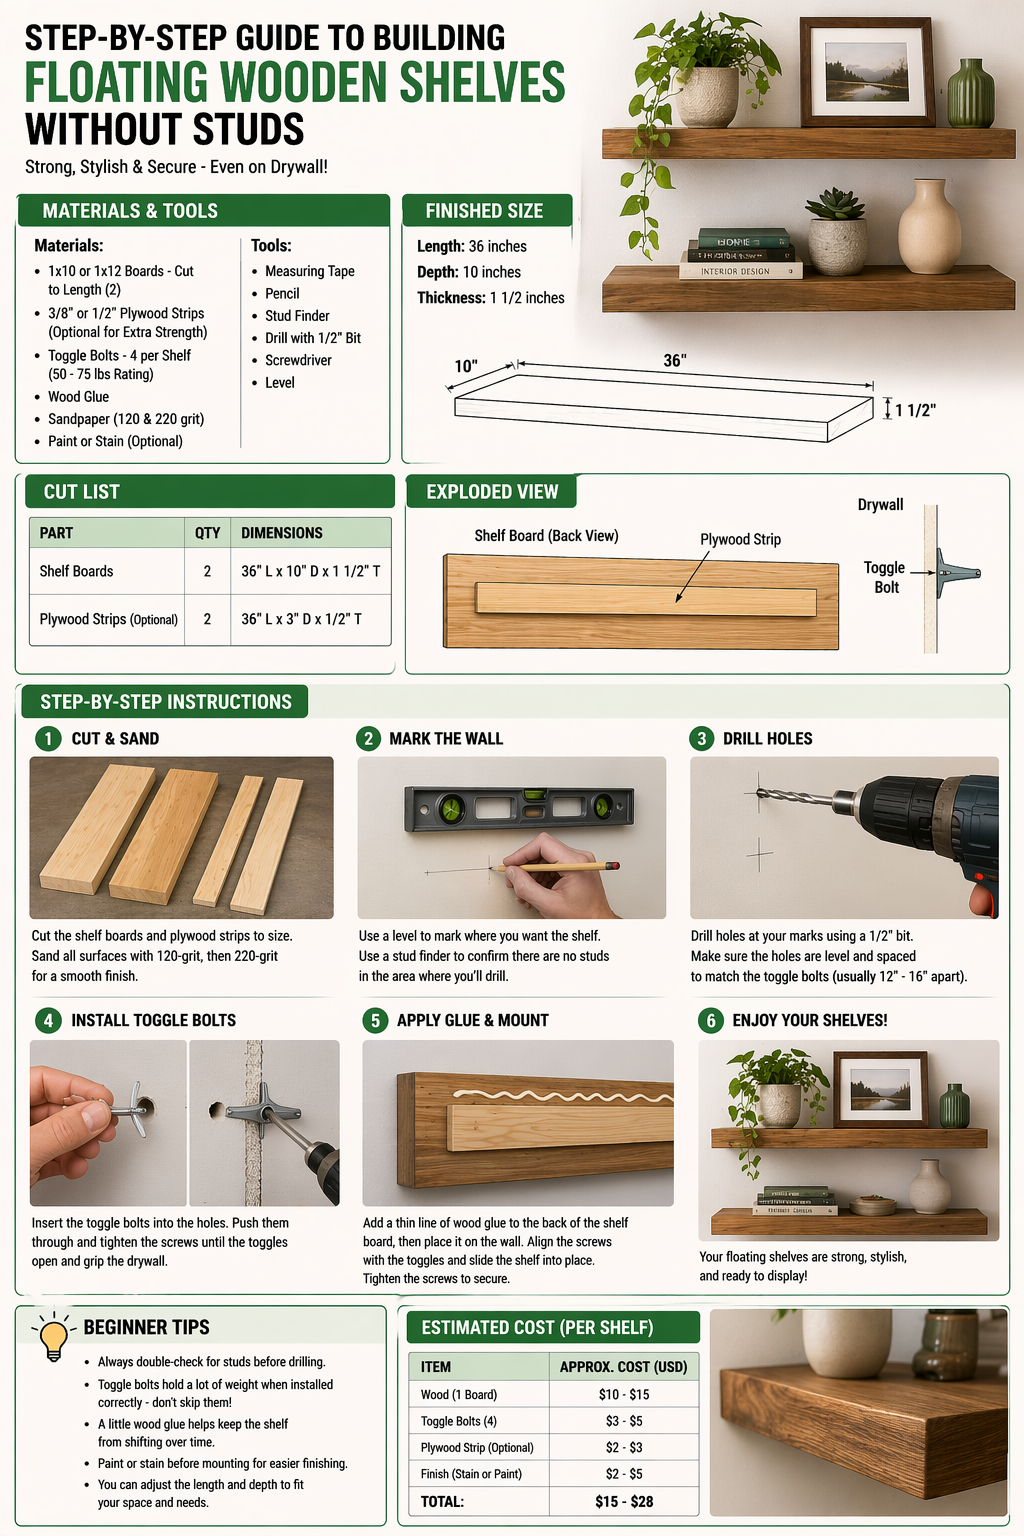
Floating wooden shelves create clean lines and usable storage on any wall. They display books, plants, and kitchen staples while freeing floor space—a combination that makes them one of the most popular easy woodworking projects online. With a straightforward plan, you can build shelves that look built-in and support real weight without visible brackets.
The secret is a hidden cleat or rod system inside the shelf body. Your plan should specify cleat thickness, screw spacing into studs, and shelf depth so items sit safely without tipping. Following measured steps prevents sagging and keeps installations level across multiple bays.
Why Floating Shelves Are Easy and Economical
Each shelf often requires only one or two boards and a short length of hardwood for the cleat. Compare that to prefabricated floating systems sold at retail, and the savings add up quickly—especially when you need three or more shelves in a row.
Tools are minimal: drill, level, stud finder, and saw. You can prefinish shelves on the bench before mounting, which is faster and cleaner than brushing polyurethane on a ladder. That workflow suits beginners who want immediate visible results in their home.
Helpful Design Choices for Every Room
In kitchens, seal shelves with a food-safe finish and keep depth moderate so jars do not overhang dangerously. In offices, wider spans may need a steel rod or thicker cleat—good plans note weight limits honestly so you choose the right hardware.
Staggered heights create visual interest on social posts and in real rooms. Use a story stick to mark identical positions on both walls when building alcove shelving for a symmetrical, professional look.
Installation Tips for Long-Term Strength
Always anchor into studs or use appropriate hollow-wall anchors rated for the load. Apply construction adhesive on the cleat in addition to screws for extra rigidity on heavy displays. Check level across the full length before the adhesive sets.
Leave slight end clearance when planning width so you can slide the shelf body on without scuffing paint. A few taps with a mallet and concealed screw plugs complete the floating illusion.
Ideal for Pinterest, Instagram, and Facebook
Before-and-after wall photos are among the most saved DIY images on Pinterest. Floating shelf projects fit kitchens, nurseries, and home offices—broad appeal that grows your audience when you share builds online.
Include keywords in captions like easy floating shelf plan and DIY wall storage so people searching for economical home upgrades discover your work and your link to more free woodworking plans.